Edit a Universal Profile
This guide might contain outdated information and will be updated soon.
You will need a Universal Profile that you can control via its KeyManager to follow this guide.
⬅️ If you don't have a Universal Profile yet, follow our previous guide Create a Universal Profile.
This guide will teach you how to customize our Universal Profile programmatically in JavaScript and includes:
- adding a profile and cover picture to our Universal Profile,
- editing our Universal Profile infos (e.g., description, badges, links),
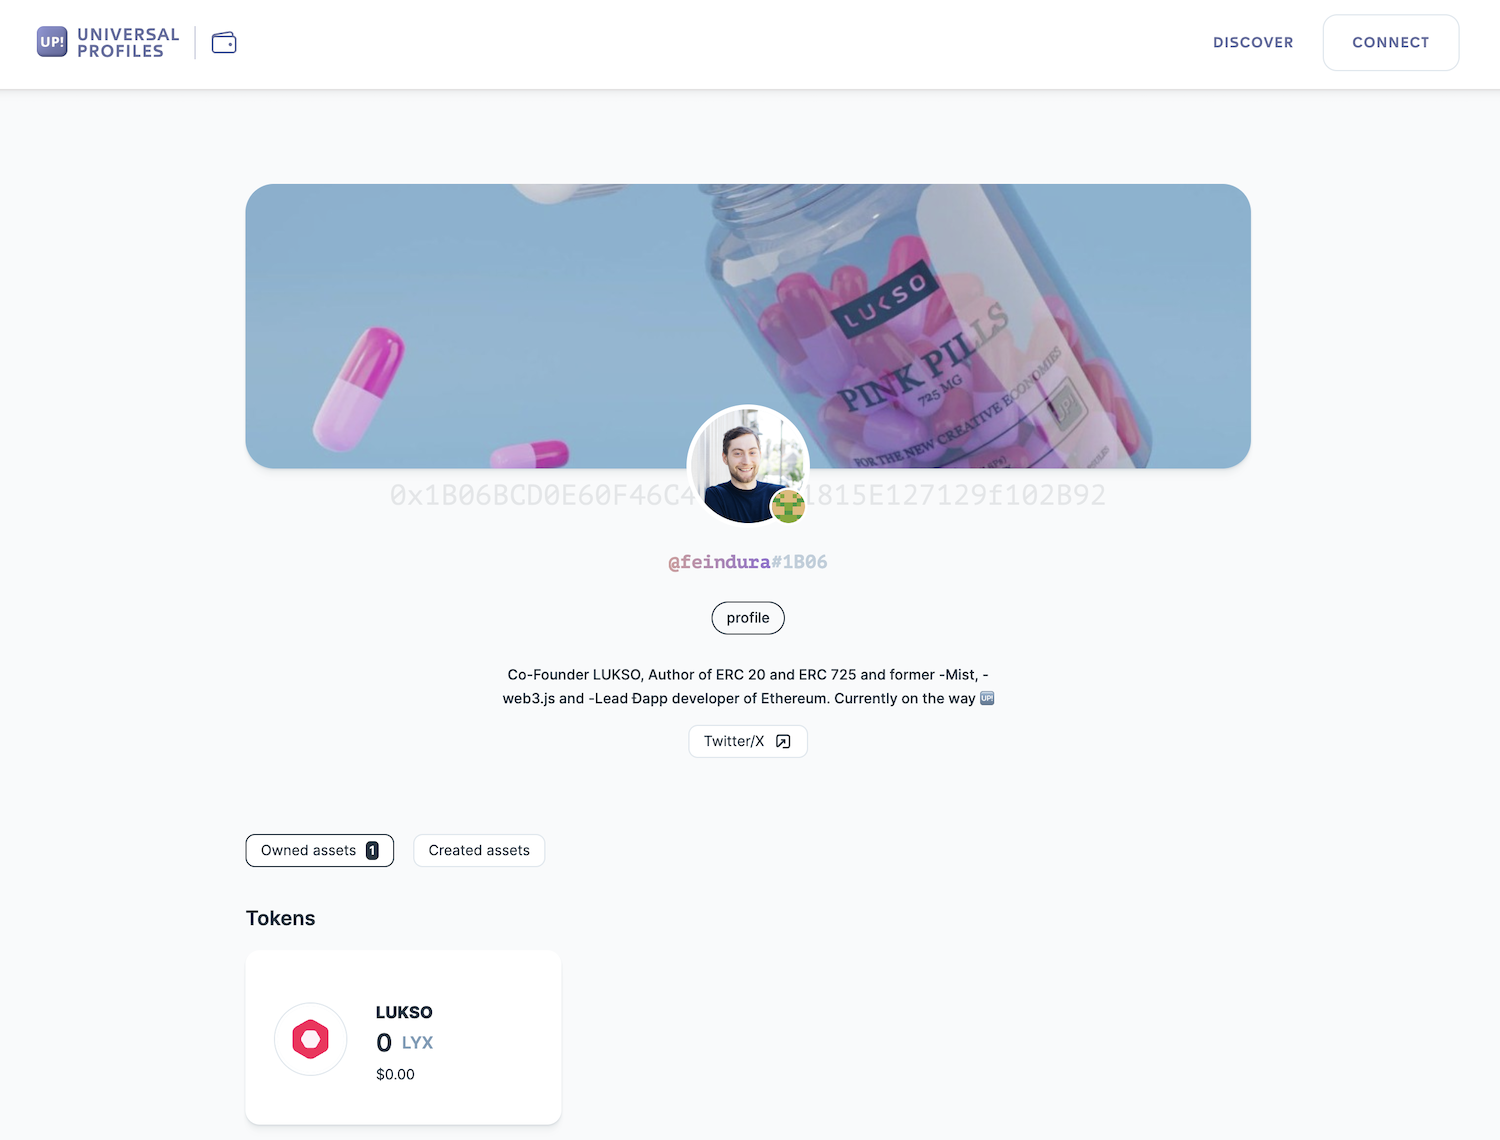
- see the updated profile details and images of our Universal Profile on the wallet.universalprofile.cloud website.
To achieve this goal, we will perform the following steps:
- Create a JSON file that contains our profile details (
LSP3Profilemetadata). - Upload this JSON file to IPFS using our lsp-factory.js tool.
- Encode + set our new LSP3Profile metadata key in our profile with our erc725.js library and web3.js.
A complete "ready to use" JS file is available at the end in the Final Code section. If you want to run the code as standalone JavaScript files within the terminal or the browser, you can open the lukso-playground repository.
Introduction
A Universal Profile is a smart contract that uses a generic key-value store (ERC725Y) as a storage design. The structure makes it possible to attach any piece of information to our Universal Profile by setting any particular value to any specific key.
A set of ERC725Y data keys is defined as an ERC725Y schema. The schema is an array of keys, where an object represents each key. Each of the objects describes the key name, the keyType (e.g., singleton, array, mapping), and the type of the data it contains (valueType).
A schema lets us know which ERC725Y data keys we can set and which information we can retrieve and edit from our Universal Profile.
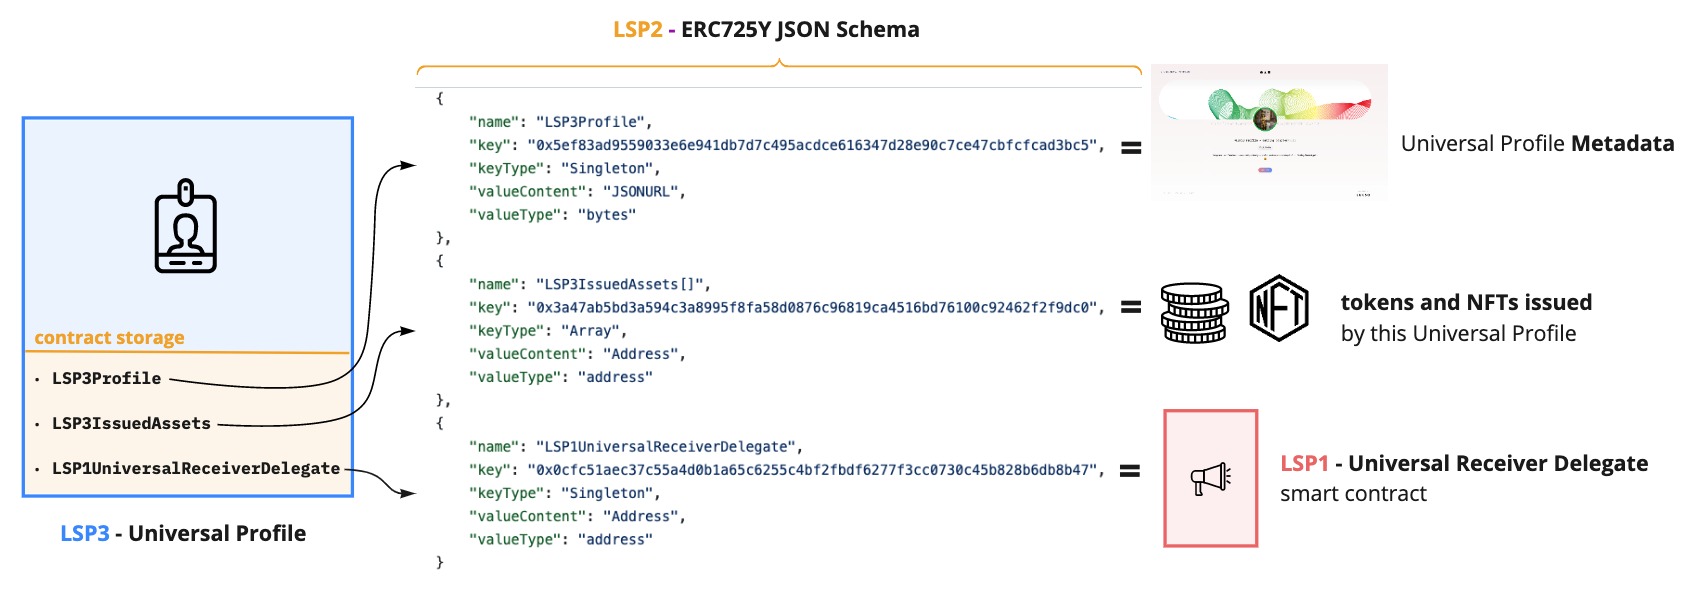
For more details, see: LSP2 - ERC725Y JSON Schema
One of the main ERC725Y data keys of the Universal Profile is the LSP3Profile key. It is a standardized key that refers to the metadata of the Universal Profile. This metadata takes the form of a reference to a JSON file.
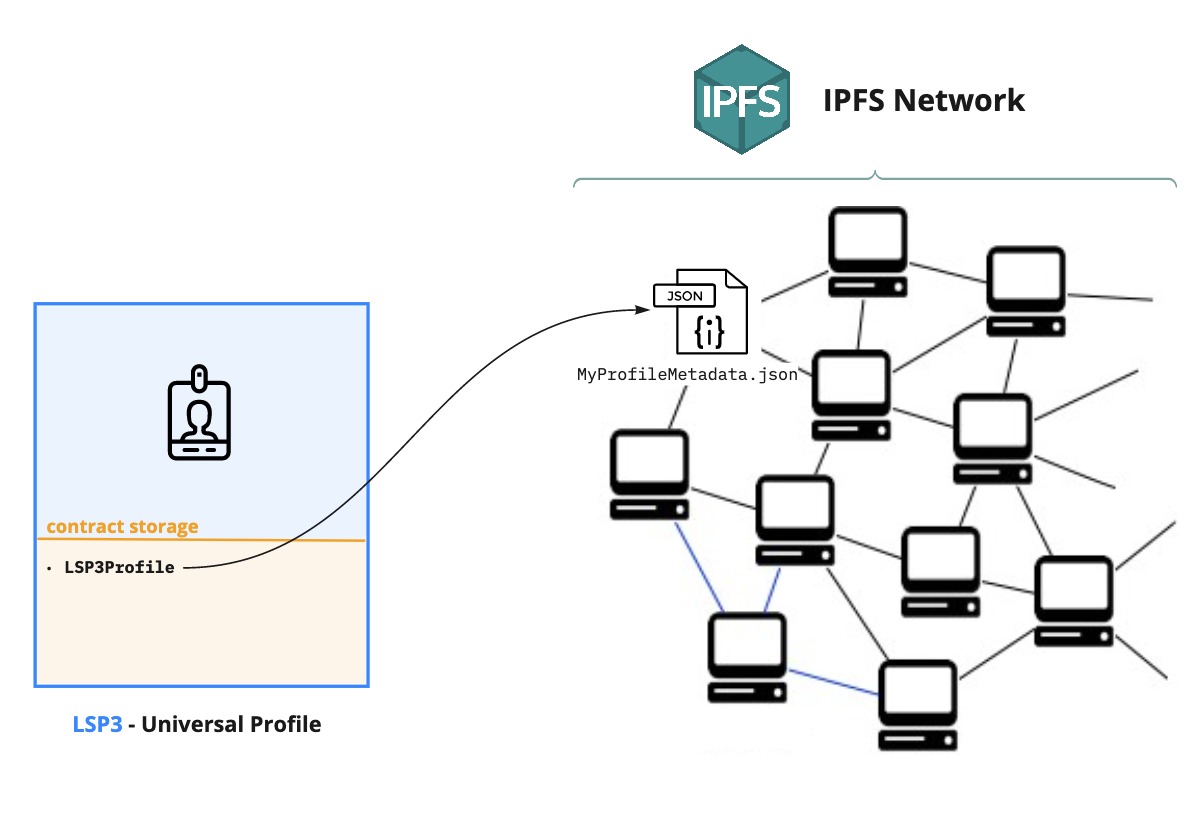
This guide will store our Universal Profile metadata on IPFS, a distributed file storage.
We can add (or edit) any pieces of informations related to our UP by the following steps:
- Create a new JSON file with new or updated info.
- Upload the file to IPFS.
- Change the reference of our LSP3Profile key to point to our uploaded JSON file.
Setup
Set up a new project with:
npm init
You can keep all the default values.
Then, install the dependencies, we will use a new tool in this guide: erc725.js:
npm install web3 @lukso/lsp-factory.js @lukso/lsp-smart-contracts @erc725/erc725.js
Step 1 - Create a new LSP3Profile JSON file
Complete "ready to use" JSON and JS files are available at the end in the Final Code section.
We will start by creating a new JSON file that will contain our LSP3Profile metadata.
Use the JSON template file below, and follow steps 1.1 and 1.2 to fill the blank fields marked with dots.
{
  "LSP3Profile": {
    "name": "...", // a self chosen username
    "description": "...", // A description, describing the person, company, organisation or creator of the profile.
    "links": [
      // links related to the profile
      {
        "title": "...", // a title for the link.
        "url": "..." // the link itself
      }
      // add more links...
    ],
    "tags": ["...", "..."], // tags related to the profile
    "profileImage": [
      {
        "width": 640, // in pixels
        "height": 609, // in pixels
        "hashFunction": "keccak256(bytes)", // do not change!
        "hash": "0x...", // add the keccak256 hash of the image here
        "url": "ipfs://..." // IPFS image identifier (CID)
      }
    ],
    "backgroundImage": [
      {
        "width": 1024, // in pixels
        "height": 576, // in pixels
        "hashFunction": "keccak256(bytes)", // do not change!
        "hash": "0x...", // add the keccak256 hash of the image here
        "url": "ipfs://..." // IPFS image identifier (CID)
      }
    ]
  }
}
1.1 - Add profile details (links, tags, etc.)
Add more details about the Universal Profile for the entity's name, description, links, and tags.
Be as creative as you want to make your Universal Profile as unique as possible! 🎨
The properties links and tags accept an array of objects or strings, so you can add as many as you need!
For editing the properties profileImage and backgroundImage, see Step 1.2 below ⬇️
1.2 - Add a profile and background image
Image sizes should be written as numbers, not as strings.
The max image width allowed on universalprofile.cloud is: profileImage <= 800px, backgroundImage <= 1800px
The JSON file for LSP3Profile accepts an array of images so that you have pictures of different sizes and dimensions.
This way, client interfaces can know which files to pick based on the container size in their interface.
For the properties profileImage and backgroundImage, we will need to add the following information:
hash: use this keccak256 image hash generator.url: upload your images to the LUKSO IPFS Gateway.
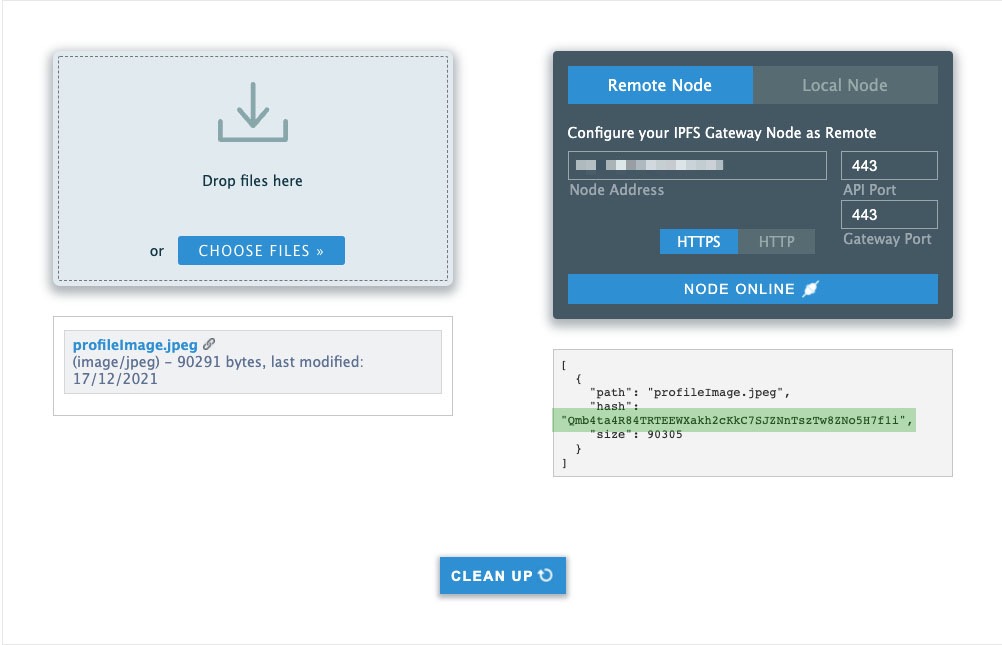
Use this IPFS file uploader tool with the settings shown below in green.
- IPFS Gateway:
api.2eff.lukso.dev - API Port / Gateway Port:
443
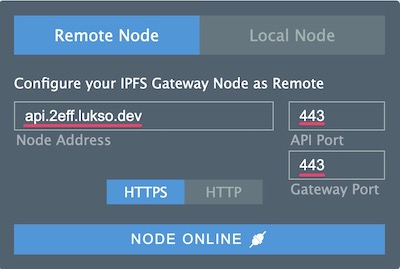
Drag & Drop your images (you can upload multiple images at once) and upload them. Once the process is completed:
- Copy the IPFS file identifier (
CID) shown in thehashfield marked with green below. - Paste the
CIDinto theurlfield in our JSON file, beginning withipfs://at the start.
Make sure to save your JSON file after you have added all your details and images.
Don't forget to delete the comments in the JSON file!
We are now ready to apply these changes to our Universal Profile. We will see how in the next section ⬇️
Step 2 - Upload the JSON file to IPFS
You should do the rest of this tutorial should be done in a new file (main.js).
We will now start writing the main code of the tutorial.
Create a new file, main.js.
Our lsp-factory.js tool provides convenience to upload our profile Metadata to IPFS.
import { LSPFactory } from '@lukso/lsp-factory.js';
// reference to the previously created JSON file (LSP3Profile metadata)
import jsonFile from './UniversalProfileMetadata.json';

const provider = 'https://rpc.testnet.lukso.network'; // RPC provider url

const lspFactory = new LSPFactory(provider, {
  deployKey: PRIVATE_KEY,
  chainId: 2828, // Chain Id of the network you want to deploy to
});

async function editProfileInfo() {
  // Step 2 - Upload our JSON file to IPFS
  const uploadResult = await lspFactory.UniversalProfile.uploadProfileData(
    jsonFile.LSP3Profile,
  );
  const lsp3ProfileIPFSUrl = uploadResult.url;
  // ipfs://Qm...
}
Step 3 - Setup erc725.js and encode the LSP3Profile data
The next step is to prepare the data used to edit our Universal Profile. Preparing the data means encoding it to write in on our Universal Profile ERC725Y smart contract.
To do so, we will use our erc725.js library, which helps us encode the data easily.
To set up the erc725.js library, we will need the following:
- The address of our Universal Profile contract: this is the address of our profile mentioned in the URL on the profile explorer.
- An ERC725Y JSON Schema: a set of ERC725Y key-value pairs (LSP2 - ERC725Y JSON Schema)
- A RPC provider:
https://rpc.testnet.lukso.network
Once our erc725.js is initialized, we can encode the LSP3Profile data to generate a key and a value.
To do so, we use the encodeData() function. We call it with an object containing the keyName and the value:
keyName:LSP3Profile, the name of the key we want to encode.value: an object with:hashFunction: we usekeccak256(standard hash function). Since we are hashing a JSON file that contains strings, we also specify the data type asutf8.hash:obtained after hashing the JSON file withkeccak256.urlof the file: this is the IPFS URL of the file, obtained in step 2.
In the same file, main.js, set up the erc725.js library.
import Web3 from 'web3';
// import ERC725
import { ERC725 } from '@erc725/erc725.js';
// ...

const web3 = new Web3('https://rpc.testnet.lukso.network');

// Step 1 - Create a new LSP3Profile JSON file
// ...

async function editProfileInfo() {
  // Step 2 - Upload our JSON file to IPFS
  // ...

  // Step 3.1 - Setup erc725.js
  const schema = [
    {
      name: 'LSP3Profile',
      key: '0x5ef83ad9559033e6e941db7d7c495acdce616347d28e90c7ce47cbfcfcad3bc5',
      keyType: 'Singleton',
      valueType: 'bytes',
      valueContent: 'VerifiableURI',
    },
  ];

  const erc725 = new ERC725(schema, profileAddress, web3.currentProvider, {
    ipfsGateway: 'https://api.universalprofile.cloud/ipfs',
  });

  // Step 3.2 - Encode the LSP3Profile data
  const encodedData = erc725.encodeData({
    keyName: 'LSP3Profile',
    value: {
      hashFunction: 'keccak256(utf8)',
      // hash our LSP3 metadata JSON file
      hash: web3.utils.keccak256(JSON.stringify(uploadResult.json)),
      url: lsp3ProfileIPFSUrl,
    },
  });
  /**
  { example keys & values
    keys: ['0x5ef83ad9559033e6e941db7d7c495acdce616347d28e90c7ce47cbfcfcad3bc5'],
    values: ['0x6f357c6aabbbf0d07b125d2c53c1ca19672e31ad768d8fd2ca55fbf0a6e94a39488a52c5697066733a2f2f516d59435154653572355a6556546274705a4d5a58535150324e785864674a46565a623631446b33674650355658']
  }
  */
}
Step 4 - Edit the Universal Profile
Now that our updated data is encoded, we are ready to set it in our Universal Profile smart contract. To do so, we will interact with our Universal Profile smart contract via Web3.js.
4.1 - Load an EOA
We will need to interact with the smart contracts from an externally owned account (EOA).
The first step is to load our EOA using our private key from previous steps.
import Web3 from 'web3';
const web3 = new Web3('https://rpc.testnet.lukso.network');

const PRIVATE_KEY = '0x...'; // your EOA private key (previously created)

const myEOA = web3.eth.accounts.wallet.add(PRIVATE_KEY);
4.2 - Create instance of UP
The first step is to create an instance of the Universal Profile smart contract. We will need:
- the contract ABI (from our npm package
@lukso/lsp-smart-contracts). - the address of the Universal Profile contract.
import Web3 from 'web3';
import UniversalProfile from '@lukso/lsp-smart-contracts/artifacts/UniversalProfile.json';

const web3 = new Web3('https://rpc.testnet.lukso.network');

// Step 4.2 - Create instance of our UP
const universalProfileContract = new web3.eth.Contract(
  UniversalProfile.abi,
  profileAddress,
);
4.3 - Set data on the Universal Profile
The final step is to edit our LSP3Profile key on our Universal Profile with the new value obtained in Step 3. We can easily access the key-value pair from the encoded data obtained with erc725.js.
// Step 4.3 - Update LSP3Profile metadata on our Universal Profile
await universalProfileContract.methods.setData(
  encodedData.keys[0],
  encodedData.values[0],
).send({ from: myEOA.address, gasLimit: 300_000 });
Final Code
Below is the complete code snippet of this guide, with all the steps compiled together.
UniversalProfileMetadata.json (example) - click to expand
{
  "LSP3Profile": {
    "name": "LUKSO Profile - Getting Started",
    "description": "Congratulation! You have successfully edited your profile, and completed step 2 of the Getting Started guide 😃",
    "links": [
      {
        "title": "Website",
        "url": "https://mywebsite.me"
      }
    ],
    "tags": ["Public Profile"],
    "profileImage": [
      {
        "width": 640,
        "height": 609,
        "hashFunction": "keccak256(bytes)",
        "hash": "0xe459e5769af85b09fb43bb8eaac561e196d58c0f5da3c5e150b6695898089402",
        "url": "ipfs://QmPCz896rcZmq8F3FuUkJinRUmPgnZGjPvZL71nAaL7Fsx"
      }
    ],
    "backgroundImage": [
      {
        "width": 1024,
        "height": 576,
        "hashFunction": "keccak256(bytes)",
        "hash": "0x1c19780d377a7b01f7dcf16e0ebffd225e29d2235625009f67cf9d86a32a79e1",
        "url": "ipfs://QmPMmEpKnmgACsWjhDUheF8TEKpspzQhAkjbY4EBbR4jgP"
      }
    ]
  }
}
import Web3 from 'web3';
import { ERC725 } from '@erc725/erc725.js';
import { LSPFactory } from '@lukso/lsp-factory.js';

import UniversalProfile from '@lukso/lsp-smart-contracts/artifacts/UniversalProfile.json';

import jsonFile from './UniversalProfileMetadata.json';

const web3 = new Web3('https://rpc.testnet.lukso.network');

// constants
const PRIVATE_KEY = '0x...';
const profileAddress = '0x...';

// Step 1 - Create a new LSP3Profile JSON file

const provider = 'https://rpc.testnet.lukso.network'; // RPC provider url

const lspFactory = new LSPFactory(provider, {
  deployKey: PRIVATE_KEY,
  chainId: 2828, // Chain Id of the network you want to deploy to
});

async function editProfileInfo() {
  // Step 2 - Upload our JSON file to IPFS
  const uploadResult = await lspFactory.UniversalProfile.uploadProfileData(
    jsonFile.LSP3Profile,
  );
  const lsp3ProfileIPFSUrl = uploadResult.url;
  // 'ipfs://QmYCQTe5r5ZeVTbtpZMZXSQP2NxXdgJFVZb61Dk3gFP5VX'

  // Step 3.1 - Setup erc725.js
  const schema = [
    {
      name: 'LSP3Profile',
      key: '0x5ef83ad9559033e6e941db7d7c495acdce616347d28e90c7ce47cbfcfcad3bc5',
      keyType: 'Singleton',
      valueType: 'bytes',
      valueContent: 'VerifiableURI',
    },
  ];

  const erc725 = new ERC725(schema, profileAddress, web3.currentProvider, {
    ipfsGateway: 'https://api.universalprofile.cloud/ipfs',
  });

  // Step 3.2 - Encode the LSP3Profile data (to be written on our UP)
  const encodedData = erc725.encodeData({
    keyName: 'LSP3Profile',
    value: {
      hashFunction: 'keccak256(utf8)',
      // hash our LSP3 metadata JSON file
      hash: web3.utils.keccak256(JSON.stringify(uploadResult.json)),
      url: lsp3ProfileIPFSUrl,
    },
  });

  // Step 4.1 - Load our EOA
  const myEOA = web3.eth.accounts.wallet.add(PRIVATE_KEY);
  console.log('EOA:', myEOA.address);

  // Step 4.2 - Create instance of our UP
  const universalProfileContract = new web3.eth.Contract(
    UniversalProfile.abi,
    profileAddress,
  );

  // Step 4.3 - Set data (updated LSP3Profile metadata) on our Universal Profile
  await universalProfileContract.methods
    .setData(encodedData.keys, encodedData.values)
    .send({ from: myEOA.address, gasLimit: 300_000 });
}
editProfileInfo();
Visualize our updated Universal Profile
You can now check your UP on the profile explorer website (make sure you are on the correct network - there is a network switch in the footer):
https://wallet.universalprofile.cloud/[UP ADDRESS]?network=testnet