Grant Permissions
This guide will teach you how to grant permissions to any address so they can interact with your 🆙. You will learn:
- How permissions in the LSP6 Key Manager work + how to create them using erc725.js.
- How to set permissions for a third party
addresson your Universal Profile
The full code of this example can be found in the 👾 lukso-playground repository.
Introduction
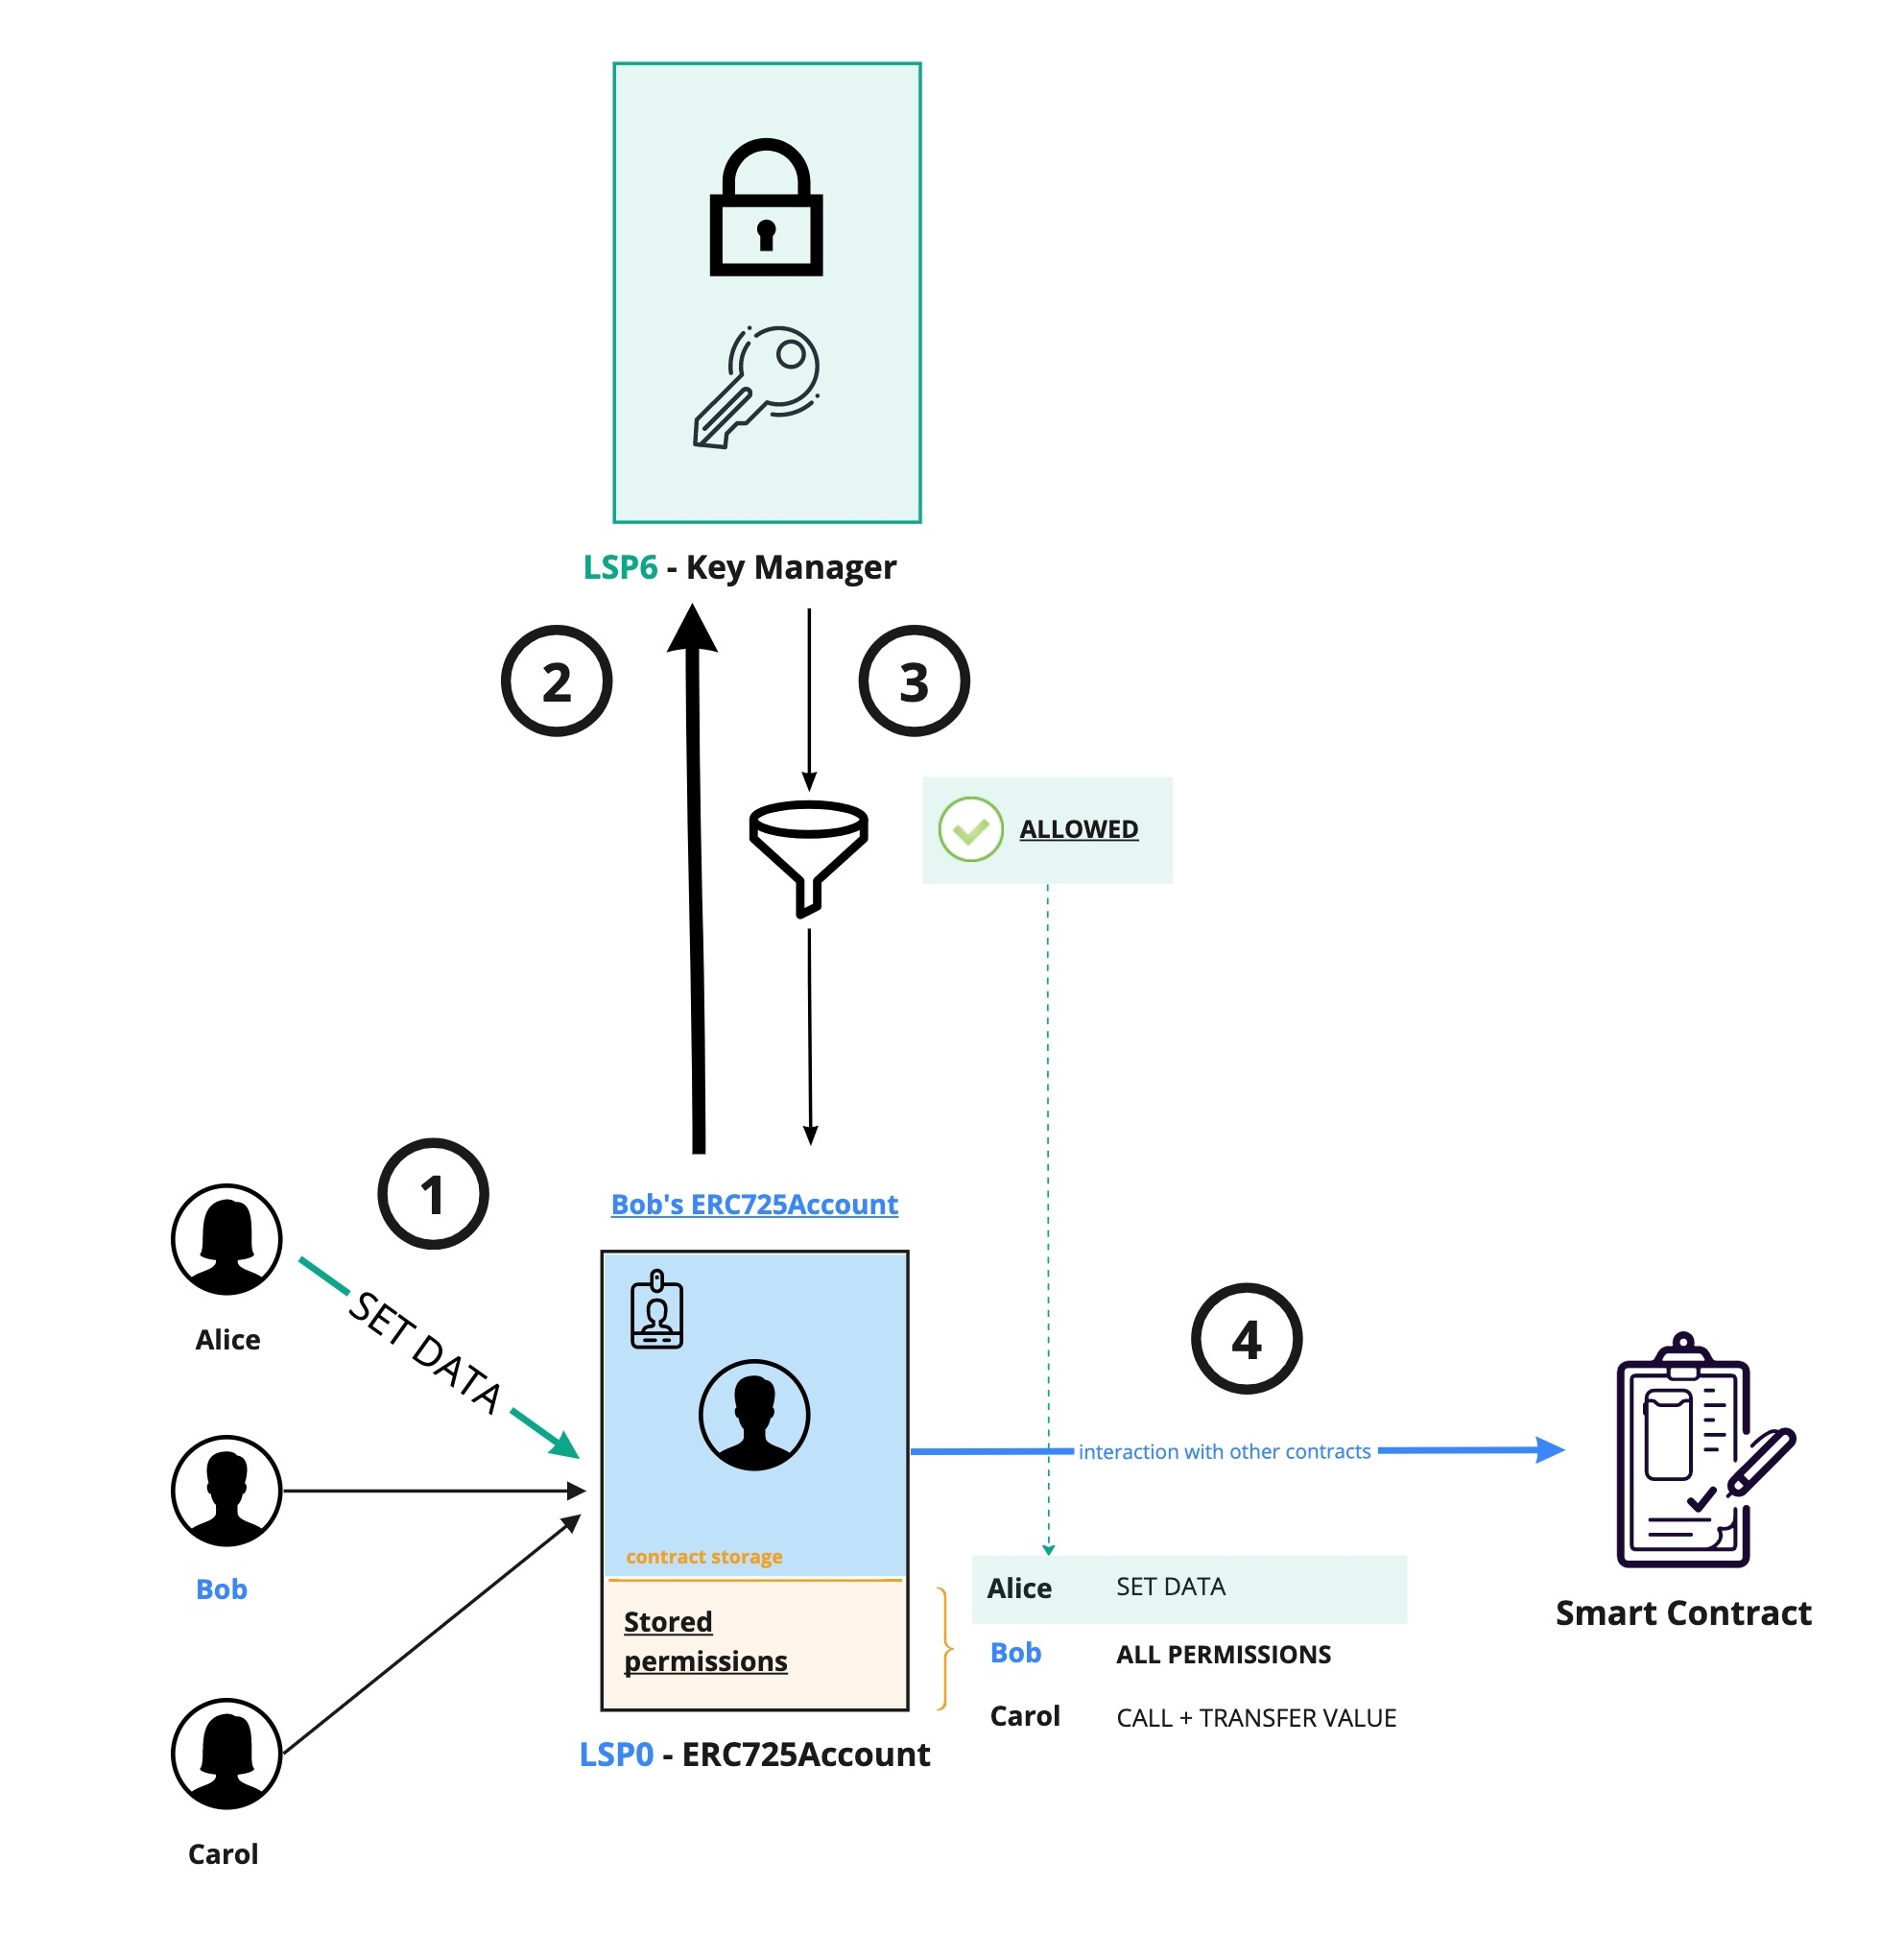
The Key Manager enables to give permissions to any third-party address to perform certain actions on our Universal Profile (UP). This includes editing the UP's metadata, transferring LYX, tokens, and NFTs, and making any other interactions on behalf of the UP. We call such addresses controllers, as they can "control" a specific Universal Profile according to their permissions on this particular UP.
The diagram above shows that when Alice sends a transaction to the Universal Profile, the UP will first call its Key Manager to verify that Alice is authorised to execute this action by checking its permissions. If the check is successful, the transaction gets executed. Otherwise, it reverts.
These permissions are stored in the Universal Profile. We need to update three data keys in the Universal Profile's storage when adding and granting a new controller some permissions.
| 🗄 ERC725Y data key | 📃 Description | 🖊 What should we update? |
|---|---|---|
AddressPermissions[] | The number of addresses that have permissions on our UP. | We need to increment it by +1. |
AddressPermissions[index] | holds a controller address at a specific index. | We need to add the beneficiary address at the new index. |
AddressPermissions:Permissions:<beneficiary-address> | this data key holds the permissions of a controller address. | We need to add the permissions of the beneficiary address under this data key. |
Setup
To follow this guide, we will need the following libraries and packages:
erc725.jsto encode the permissions- The
lsp-smart-contractspackage to get the Universal Profile's ABI web3.jsorethers.jsto interact with ourUniversalProfilesmart contract.
- ethers
- web3
npm install ethers @erc725/erc725.js @lukso/lsp-smart-contracts
npm install web3 @erc725/erc725.js @lukso/lsp-smart-contracts
Step 1 - Initialize erc725.js
First initialize erc725.js with the JSON schema of the LSP6 Key Manager. The schema is necessary to create and encode the permissions.
import { ERC725 } from '@erc725/erc725.js';
import LSP6Schema from '@erc725/erc725.js/schemas/LSP6KeyManager.json';

// step 1 - initialize erc725.js with the schemas of the permissions data keys from LSP6 Key Manager
const erc725 = new ERC725(
  LSP6Schema,
  myUniversalProfileAddress,
  'https://rpc.testnet.lukso.network',
);
Step 2 - Encode the permissions data
More permissions are available in erc725.js. See the encodePermissions(...) function for a complete list.
To learn about what each permission enables, see the Standards > LSP6 Key Manager > Permissions section.
Let's consider in our example that we want to grant the permission SUPER_SETDATA to a beneficiaryAddress, so that it can edit any of the Universal Profile metadata.
To do so, we will use the encodePermissions(..) function, a convenience function from the erc725.js library to encode permissions as their raw bytes32 value. The function takes as an input will an object of all permissions that will be set.
// Create the raw permissions value to allow an address
// to set any data keys (except LSP17 extensions and LSP1 Universal Receiver Delegates)
// on our Universal Profile
const permissionSetAnyDataKey = erc725.encodePermissions({
  SUPER_SETDATA: true,
});
If you want to grant more than one permission, simply pass the other available permissions in the object. For instance, to also grant permission to transfer the LYX of the UP:
const multiplePermissions = erc725.encodePermissions({
  SUPER_SETDATA: true,
  TRANSFERVALUE: true,
});
As we learnt, permissions of controllers live inside the Universal Profile storage. They are precisely stored inside the ERC725Y storage of the UP. Therefore, as per the data structure of ERC725Y, we need to assign the encoded permission and the controller address as values to specific data keys. We will do that
| 🎯 Objective | ✍🏼 How is this done? |
|---|---|
Assign this permission to our beneficiaryAddress. | By setting this encoded permission as the value for the data key AddressPermissions:Permissions:<address>, where <address> will be the address of the beneficiary. |
Add our beneficiaryAddress. | By adding the beneficiaryAddress inside the AddressPermissions[] Array, and increment the AddressPermissions[] array length (+1). |
// address to give permissions to (can be an EOA or a smart contract)
const newControllerAddress = '0xcafecafecafecafecafecafecafecafecafecafe';

// Retrieve the list of addresses that have permissions on the Universal Profile (= controllers)
const addressPermissionsArrayValue = await erc725.getData(
  'AddressPermissions[]',
);
const numberOfControllers = addressPermissionsArrayValue.value.length;

// Encode the set of key-value pairs to set a new controller with permissions on the Universal Profile
const permissionData = erc725.encodeData([
  // this sets the permission `SUPER_SETDATA` to the new controller address
  {
    keyName: 'AddressPermissions:Permissions:<address>',
    dynamicKeyParts: beneficiaryAddress,
    value: beneficiaryPermissions,
  },
  // The `AddressPermissions[]` array contains the list of permissioned addresses (= controllers)
  // This adds the `newControllerAddress` in this list at the end (at the last index) and increment the array length.
  {
    keyName: 'AddressPermissions[]',
    value: [newControllerAddress],
    startingIndex: numberOfControllers,
    totalArrayLength: numberOfControllers + 1,
  },
]);
Step 3 - Set the permissions on the 🆙
We have now all the encoded data needed to setup the permissions of this third party address on our Universal Profile! 💪🏻
The last and final step is to simply call the setDataBatch(...) function on the UniversalProfile contract, passing the data keys and values previously encoded in step 2. The steps in the code will be:
- Create an instance of the Universal Profile smart contract. You will need:
- the
UniversalProfileABI from the@lukso/lsp-smart-contractsnpm package. - the address of the Universal Profile.
- the
- Call the
setDataBatch(bytes32[],bytes[])function, passing as the arguments the content obtained from step 2.
- ethers
- web3
import { ether } from 'ethers';
import UniversalProfileArtifact from '@lukso/lsp-smart-contracts/artifacts/UniversalProfile.json';

// Connect the UP Browser Extension and retrieve our UP Address
const provider = new ethers.BrowserProvider(window.lukso);
const accounts = await provider.send('eth_requestAccounts', []);

// Create an instance of the UniversalProfile contract
const universalProfile = new ethers.Contract(
  accounts[0],
  UniversalProfileArtifact.abi,
);

// Send the transaction
await myUniversalProfile
  .connect(accounts[0])
  .setData(permissionData.keys, permissionData.values);
import Web3 from 'web3';
import UniversalProfileArtifact from '@lukso/lsp-smart-contracts/artifacts/UniversalProfile.json';

// Connect the UP Browser Extension and retrieve our UP Address
const provider = new Web3(window.lukso);
const accounts = await provider.eth.requestAccounts();

// Create an instance of the UniversalProfile contract
const myUniversalProfile = new web3.eth.Contract(
  UniversalProfileArtifact.abi,
  accounts[0],
);

// Send the transaction
await myUniversalProfile.methods
  .setData(permissionData.keys, permissionData.values)
  .send({
    from: accounts[0],
  });
Testing the permissions
We can now check that the permissions have been correctly set by querying the AddressPermissions:Permissions:<address> data key on the Universal Profile.
If everything went well, the code snippet below should return you an object with the permission SETDATA set to true.
- ethers
- web3
- erc725js
const result = await myUniversalProfile.getData(permissionData.keys[0]);
console.log(
  `The beneficiary address ${newControllerAddress} has now the following permissions:`,
  ERC725.decodePermissions(result),
);
const result = await myUniversalProfile.methods
  .getData(permissionData.keys[0])
  .call();
console.log(
  `The beneficiary address ${newControllerAddress} has now the following permissions:`,
  ERC725.decodePermissions(result),
);
const result = await erc725.getData({
  keyName: 'AddressPermissions:Permissions:<address>',
  dynamicKeyParts: newControllerAddress,
});

console.log(
  `The beneficiary address ${newControllerAddress} has now the following permissions:`,
  ERC725.decodePermissions(result),
);
Finally, to test the actual permissions, you can do this guide using a beneficiaryAddress that you have control over.
You can try the Edit Universal Profile guide, using this new 3rd party address that you have control over to test if it can successful edit the profile details. This will give you guarantee that this beneficiaryAddress has the SETDATA permission working.