Execute Relay Transactions
In this guide, you will learn how to sign and execute gas-less transactions. Such transaction can be executed by any trusted third party who will pay for the gas on behalf of the user (= address) who signed the transaction.
As an example for this guide, the transaction that will be executed without requiring to pay for gas will be a LYX transfer.
What are Relay Transactions?
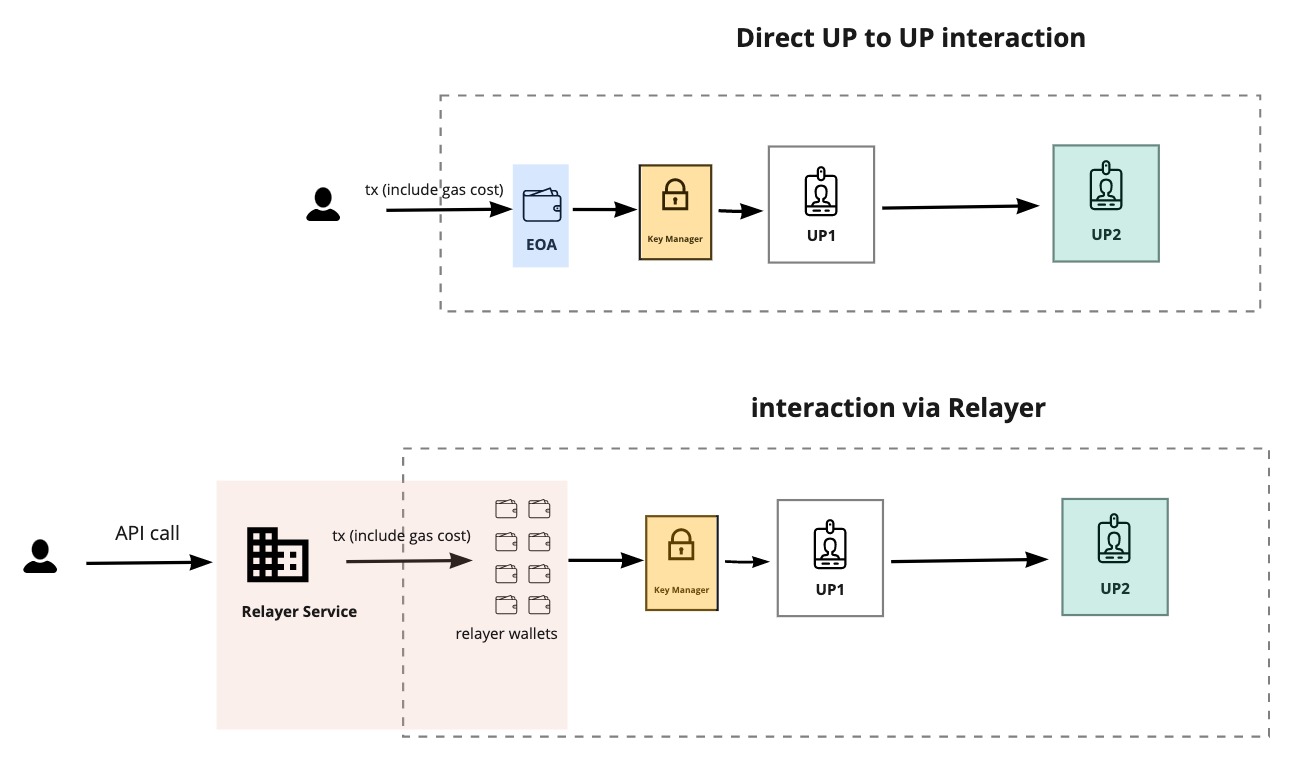
The LSP6 KeyManager standard empowers any user to execute a transaction on behalf of a Universal Profile, provided they possess a valid transaction signed by a key that controls the Universal Profile. This capability significantly enhances the user's control and flexibility in managing their transactions.
Relayed execution enables the creation of Transaction Relayer Services, which can execute transactions on behalf of users, without having any control over their Universal Profile. Relayers abstract away the gas from users.
Another example use case would be Alice sending an encoded transaction that updates the LSP3Profile picture of her Universal Profile to a second user, Bob, who executes the transaction and pays the gas cost on behalf of Alice.
Users who created their 🆙 via universalprofile.cloud benefit from a monthly gas quota paid by LUKSO. ⛽️ ✅
This aims to help onboard new users to web3! 💪🏻
To execute relay calls, the address signing the relay transaction need the EXECUTE_RELAY_CALL permission.
Setup
You will need the following dependencies to follow this guide:
ethers.jsorweb3.js.@lukso/lsp-smart-contractspackage to get the artifacts of the LSP contracts.@lukso/eip191-signer.jslibrary to sign the relay transaction.
- ethers
- web3
npm install ethers @lukso/lsp-smart-contracts @lukso/eip191-signer.js
npm install web3 @lukso/lsp-smart-contracts @lukso/eip191-signer.js
Step 1 - Prepare the contact instances
First, create an instance of the Universal Profile contract (at the defined address) and its Key Manager. The Key Manager's address can be obtained by calling the owner() function on the Universal Profile.
- ethers
- web3
import { ethers } from 'ethers';

import UniversalProfileContract from '@lukso/lsp-smart-contracts/artifacts/UniversalProfile.json';
import KeyManagerContract from '@lukso/lsp-smart-contracts/artifacts/LSP6KeyManager.json';

const provider = new ethers.JsonRpcProvider(
  'https://rpc.testnet.lukso.network',
);

// Setup the contract instance of the Universal Profile
const universalProfile = new ethers.Contract(
  '0x...', // Universal Profile address
  UniversalProfileContract.abi,
  controllerAddress, // controller address with permissions on the Universal Profile
);

// Call the Universal Profile contract to get the Key Manager
const keyManagerAddress = await universalProfile.owner();

// Setup the contract instance of the Key Manager
const keyManager = new ethers.Contract(
  keyManagerAddress,
  KeyManagerContract.abi,
  controllerAddress,
);
import Web3 from 'web3';

import UniversalProfileContract from '@lukso/lsp-smart-contracts/artifacts/UniversalProfile.json';
import KeyManagerContract from '@lukso/lsp-smart-contracts/artifacts/LSP6KeyManager.json';

const web3 = new Web3('https://rpc.testnet.lukso.network');
const universalProfileAddress = ;

// Setup the contract instance of the Universal Profile
const universalProfile = new web3.eth.Contract(
  UniversalProfileContract.abi,
  '0x...', // Universal Profile address
);

// Call the Universal Profile contract to get the Key Manager
const keyManagerAddress = await universalProfile.methods.owner().call();

// Setup the contract instance of the Key Manager
const keyManager = new web3.eth.Contract(
  KeyManagerContract.abi,
  keyManagerAddress,
);
Step 2 - Prepare & Sign the Relay Call
This logic must be implemented client-side and sent to the Transaction Relay Service (for instance via API).
2.1 - Encode the calldata
We need to define what the Universal Profile will execute. As mentioned in the introduction, this guide will use as an example of a transaction a LYX transfer from the Universal Profile.
The first step will therefore be to ABI-encode an execute(...) function call to transfer some LYX to an address.
- ethers
- web3
// Generate the payload of the transaction
const abiPayload = universalProfile.interface.encodeFunctionData('execute', [
  0, // Operation type: CALL
  '0xcafecafecafecafecafecafecafecafecafecafe', // Recipient
  ethers.parseEther('3'), // transfer 3 LYX to recipient
  '0x', // Optional transaction data
]);
// Generate the payload of the transaction
const abiPayload = universalProfile.methods
  .execute(
    0, // Operation type: CALL
    '0xcafecafecafecafecafecafecafecafecafecafe', // Recipient
    web3.utils.toWei(3), // Transfer 3 LYX to recipient
    '0x', // Optional transaction data
  )
  .encodeABI();
2.2 - Prepare the parameters
For the transaction to be executed by a third party, we need to prepare the executeRelayCall function parameters.
function executeRelayCall(
  bytes signature,
  uint256 nonce,
  uint256 validityTimestamps,
  bytes payload
) external payable returns (bytes);
| Parameter | |
|---|---|
nonce | The nonce of the address (= controller) that will sign the executeRelayCall. Retrieved via getNonce on the Key Manager |
channelId | The channel where the call will be registered after execution. Define to execute the call either in parallel (across different channels) of other relay calls, or require it to be executed after another call. 📓 See "Out of order execution" for more details |
validityTimestamp | Define the time interval during which the payload can be executed. Use a value of 0 to make the transaction always valid for an undefinite period of time. 📓 See section Contracts > Execute Relay Calls > Validity Timestamps for more details. |
payload | The actual function being called (as an abi-encoded calldata from step 2) on the Universal Profile contract. In this example, the transaction payload will be a basic LYX transfer. |
- ethers
- web3
// initiate contract instances from Step 2

const channelId = 0;

// Retrieve the nonce of the EOA controller
const nonce = await keyManager.getNonce(controllerAccount.address, channelId);

const validityTimestamps = 0; // No validity timestamp set
const msgValue = 0; // Amount of native tokens to fund the UP with while calling

// Generate the payload of the transaction
const abiPayload = universalProfile.interface.encodeFunctionData('execute', [
  0, // Operation type: CALL
  '0xcafecafecafecafecafecafecafecafecafecafe', // Recipient
  ethers.parseEther('3'), // transfer 3 LYX to recipient
  '0x', // Optional transaction data
]);
// initiate contract instances from Step 2

const channelId = 0;

// Retrieve the nonce of the EOA controller
const nonce = await keyManager.methods
  .getNonce(controllerAccount.address, channelId)
  .call();

const validityTimestamps = 0; // No validity timestamp set
const msgValue = 0; // Amount of native tokens to fund the UP with while calling

// Generate the payload of the transaction
const abiPayload = universalProfile.methods
  .execute(
    0, // Operation type: CALL
    '0xcafecafecafecafecafecafecafecafecafecafe', // Recipient
    web3.utils.toWei(3), // Transfer 3 LYX to recipient
    '0x', // Optional transaction data
  )
  .encodeABI();
3.2 - Sign with LSP25 Sig Format
For more information regarding the construction of an LSP25 signature, see "Signing Relay Transactions".
The next step for the client side is to sign the transaction message. This is done using the private key of a controller that has some permission on the Universal Profile to execute the transaction on, without needing us to pay for the gas.
To do that, we will use our convenience library eip191-signer which make the signing for us.
The transaction message is constructed by encoding and signing the following:
- Version of the LSP25 standard (
LSP25_VERSION). - Address of the Key Manager (
keyManagerAddress). - Identifier of the blockchain network (
chainId). - Current nonce of the signing EOA controller (
nonce). - The transaction validity timestamp (
validityTimestamps). - Amount of native tokens to fund the UP with while calling (
msgValue). - The ABI Payload of operations that will be executed (
abiPayload).
- ethers
- web3
Never share your private controller key or upload it to public repositories. Anyone who possesses it can access your funds and assets and gain control over your Universal Profile in case the controller has administrative rights!
//...

// Get the network ID
const { chainId } = await provider.getNetwork();

// Encode the Message
const encodedMessage = ethers.solidityPacked(
  // Types of the parameters that will be encoded
  ['uint256', 'uint256', 'uint256', 'uint256', 'uint256', 'bytes'],
  [
    // MUST be number `25`
    // Encoded value: `0x0000000000000000000000000000000000000000000000000000000000000019`
    LSP25_VERSION,

    // e.g: `4201` for LUKSO Testnet
    // Encoded value: `0x0000000000000000000000000000000000000000000000000000000000001069`
    chainId,

    // e.g: nonce number 5 of the signing controller that wants to execute the payload
    // Encoded value: `0x0000000000000000000000000000000000000000000000000000000000000005`
    nonce,

    // e.g: valid until 1st January 2025 at midnight (GMT).
    // Timestamp = 1735689600
    // Encoded value: `0x0000000000000000000000000000000000000000000000000000000067748580`
    validityTimestamps,

    // e.g: not funding the contract with any LYX (0)
    // Encoded value: `0x0000000000000000000000000000000000000000000000000000000000000000`
    msgValue,

    // e.g: send 3 LYX to address 0xcafecafecafecafecafecafecafecafecafecafe
    // by calling execute(uint256,address,uint256,bytes)
    // Encoded value: `0x44c028fe00000000000000000000000000000000000000000000000000000000
    //                 00000000000000000000000000000000cafecafecafecafecafecafecafecafeca
    //                 fecafecafecafe00000000000000000000000000000000000000000000000029a2
    //                 241af62c0000000000000000000000000000000000000000000000000000000000
    //                 000000008000000000000000000000000000000000000000000000000000000000
    //                 00000000`
    abiPayload,
  ],
);

// Instantiate EIP191 Signer
const eip191Signer = new EIP191Signer();

const { signature } = await eip191Signer.signDataWithIntendedValidator(
  keyManagerAddress,
  encodedMessage,
  '0xxxxxxxxx...xxxxxxxx', // controller / signer private key (65 bytes long)
);
Never share your private controller key or upload it to public repositories. Anyone who possesses it can access your funds and assets and gain control over your Universal Profile in case the controller has administrative rights!
// ...

// Get the network ID
const chainId = await web3.eth.getChainId();

// Encode the Message
const encodedMessage = web3.utils.encodePacked(
  // MUST be number `25`
  // Encoded value: `0x0000000000000000000000000000000000000000000000000000000000000019`
  { value: LSP25_VERSION, type: 'uint256' },

  // e.g: `4201` for LUKSO Testnet
  // Encoded value: `0x0000000000000000000000000000000000000000000000000000000000001069`
  { value: chainId, type: 'uint256' },

  // e.g: nonce number 5 of the signing controller that wants to execute the payload
  // Encoded value: `0x0000000000000000000000000000000000000000000000000000000000000005`
  { value: nonce, type: 'uint256' },

  // e.g: not funding the contract with any LYX (0)
  // Encoded value: `0x0000000000000000000000000000000000000000000000000000000000000000`
  { value: validityTimestamps, type: 'uint256' },

  // e.g: not funding the contract with any LYX (0)
  // Encoded value: `0x0000000000000000000000000000000000000000000000000000000000000000`
  { value: msgValue, type: 'uint256' },

  // e.g: send 3 LYX to address 0xcafecafecafecafecafecafecafecafecafecafe
  // by calling execute(uint256,address,uint256,bytes)
  // Encoded value: `0x44c028fe00000000000000000000000000000000000000000000000000000000
  //                 00000000000000000000000000000000cafecafecafecafecafecafecafecafeca
  //                 fecafecafecafe00000000000000000000000000000000000000000000000029a2
  //                 241af62c0000000000000000000000000000000000000000000000000000000000
  //                 000000008000000000000000000000000000000000000000000000000000000000
  //                 00000000`
  { value: abiPayload, type: 'bytes' },
);

// Instantiate EIP191 Signer
const eip191Signer = new EIP191Signer();

const { signature } = await eip191Signer.signDataWithIntendedValidator(
  keyManagerAddress,
  encodedMessage,
  '0xxxxxxxxx...xxxxxxxx', // controller / signer private key (65 bytes long)
);
After the signature has been generated, it can be sent to the third party to be executed on the network. We will cover this in the last section "Step 3 - Execute the Relay Call".
Step 3 - Execute the Relay Call
This logic must be implemented on the relayer-side where the transaction will be sent to the network to be executed.
You can find more information about executeRelayCall within the LSP6 Contract Documentation .
To execute a previously signed transaction, the relayer will need all the following information:
signaturegenerated in step 2.3.nonceof the signing controller.validityTimestampsof the transaction.abiPayloadas abi-encoded function call to execute on the 🆙.keyManagerAddressassociated with the Universal Profile we want to execute on.
The relayer can now call the executeRelayCall function on the Key Manager (keyManagerAddress) of the profile, passing all these information as function arguments.
- ethers
- web3
import { ethers } from 'ethers';

import KeyManagerContract from '@lukso/lsp-smart-contracts/artifacts/LSP6KeyManager.json';

const provider = new ethers.JsonRpcProvider(
  'https://rpc.testnet.lukso.network',
);

/**
 * Prepare received parameters:
 * keyManagerAddress, signature, nonce
 * validityTimestamps, abiPayload
 */

// Setup the Universal Profile controller account
const relayControllerPrivateKey = '0x...';
const relayControllerAccount = new ethers.Wallet(controllerPrivateKey).connect(
  provider,
);

// Setup the contract instance of the Key Manager
const keyManager = new ethers.Contract(
  keyManagerAddress,
  KeyManagerContract.abi,
  relayControllerAccount,
);

const executeRelayCallTransaction = await keyManager
  .connect(relayControllerAccount)
  .executeRelayCall(signature, nonce, validityTimestamps, abiPayload);

const receipt = await executeRelayCallTransaction.wait();
console.log('Transaction receipt:', receipt);
import Web3 from 'web3';

import KeyManagerContract from '@lukso/lsp-smart-contracts/artifacts/LSP6KeyManager.json';

const web3 = new Web3('https://rpc.testnet.lukso.network');

/**
 * Prepare received parameters:
 * keyManagerAddress, signature, nonce
 * validityTimestamps, abiPayload
 */

// Setup your controller account executing the transaction
const relayControllerPrivateKey = '0x...';
const relayControllerAccount =
  web3.eth.accounts.wallet.add(controllerPrivateKey);

// Setup the contract instance of the Key Manager
const keyManager = new web3.eth.Contract(
  KeyManagerContract.abi,
  keyManagerAddress,
);

const executeRelayCallTransaction = await keyManager.methods
  .executeRelayCall(signature, nonce, validityTimestamps, abiPayload)
  .send({
    from: relayControllerAccount.address,
    gasLimit: 300_000,
  });

const receipt = await executeRelayCallTransaction.wait();
console.log('Transaction receipt:', receipt);